

A Few Switch Lubing Tips
Look, switch lubing is an aftermarket mechanical keyboard modification technique that has been around since at least 2013 and has been beaten to death by seemingly every content creator in existence (except me). Over the span of that decade, hundreds of guides, articles, and videos have all been made giving advice as broad as which type of lube to use for which switch all the way down to the minute technique and viscosity required for specifically ‘this’ part of ‘that’ switch. Quite frankly, there’s very little left to be suggested that hasn’t already been covered at least once over and you’re more likely to listen to your good friend that drug you into this hobby than any one of those old articles anyhow. Assuming you are willing to listen to the advice of others, though, any one of these articles or videos should suffice to tell you how to immediately get into the practice of lubing switches. In my experience of both lubing switches and coming across all of these endless takes on the topic, though, I often find myself forgetting or missing a few key pieces of advice which will save you more time, money, and pain than you already are going through with the entire process of modifying your aftermarket components for your customized mechanical keyboard. Surely that all is the more efficient, cost-effective route than just buying a board on mechmarket… right?
Tip #1:
Do practice lubing a few switches before committing to a whole batch but don’t take too long to commit to a technique and style.

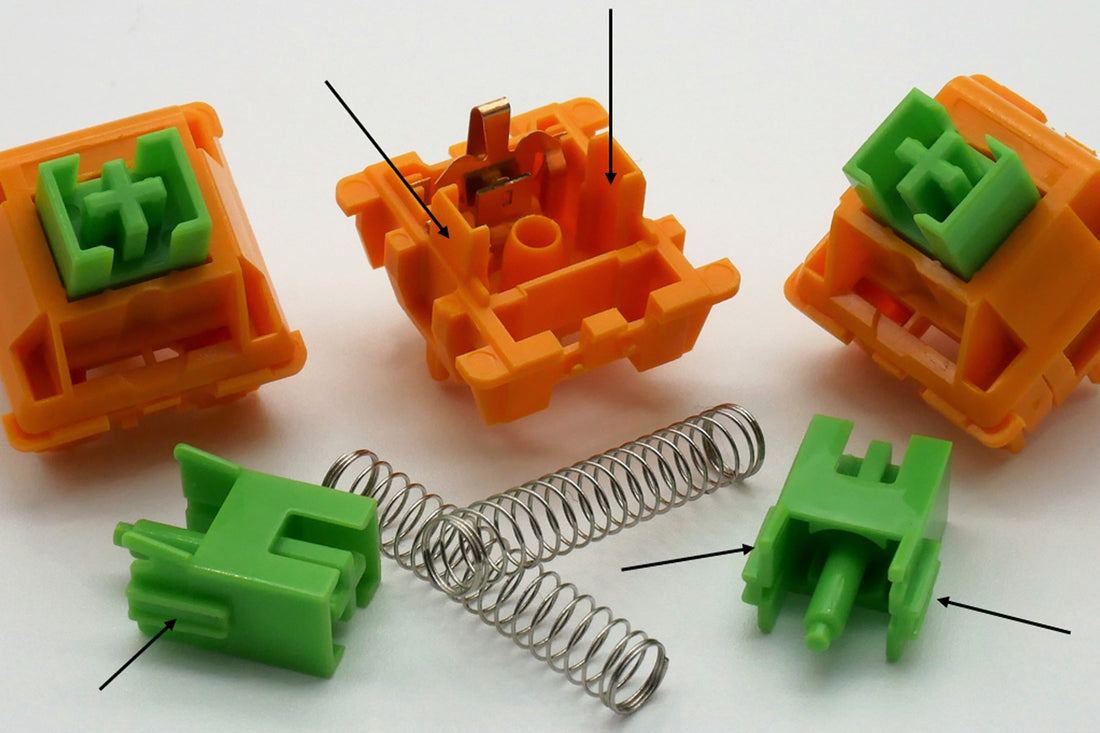
Figure 1: Disassembled Melon Milk Tactile
Countless times over in my personal build experience, I’ll find myself in a situation where I’ve opened 110 switches, gotten all of my lube and brushes ready, put on a good podcast or movie in the background, and started lubing switches to only then find out I don’t like this lube and switch pair. Whether its testing your lubing technique or the lube and switch pairing, you should always test 3-4 switches before committing to a whole batch. In doing this you will not only be able to test out some various techniques you’re curious about to find out which is best, but you’ll get a quick chance to check your switch-to-switch consistency and narrow in on that repeatability. Remember, you’re not just lubing a switch or two, you’re often lubing several dozen or more at one time. Finding a pattern of lube application that takes you only a minute or two per switch that you can also repeat over and over is the key skill to get good at here. While this speed and consistency is something which will strengthen only with time and practice, mentally giving yourself one to two minutes per switch and a few practices runs before diving in deep will prevent your lubing sessions from turning into that dreaded marathon that so many new people come to hate!
Tip #2:
Do keep in mind where the majority of plastic-on-plastic friction occurs but don’t go chasing after every single spot in doing so.

Figure 2: Huano Pineapple switches with slider rails and slider rail guides noted with arrows.
While I’m sure I’ve pissed off some switch lubing purists in the audience here who are meticulous switch lubing robots that diligently paint each and every surface of every switch they’ve ever touched in their lives, we all need to realize that that is not the average person in this hobby. When lubing switches, the goal is to reduce the feeling of plastic-on-plastic friction points in each switch (and from advice in Tip #1, doing so in a time efficient manner). The bulk majority of scratch in switches will come from the pairing of the slider rails on the stems and slider rail guides in the bottom housing, as pointed to with arrows above. If you simply opened switches just to lube these four points, and these four points alone, the bulk majority of scratch is taken care of and efforts spent beyond this begin to diminish. While lubing the other sides of the stem, the interface between the stem legs and the leaves (carefully), and the interiors of the bottom housings may all help reduce scratch that much further, you’ve got to decide if the added time and effort is worth the return on your end. In the event that you’re not even sure it is worth it, that’s why you should always test out a few switches at the start to see!
Tip #3:
Do consider lubing your springs but don’t do it the hard way by hand!

Figure 3: You might not like it, but this is what peak performance looks like.
In addition to considering plastic-on-plastic points of friction within any switch, lubing of springs is extremely popular because it can help cut down on metallic pingy sounds or weird noises from when springs jump around inside of the switch housings. While lube will help stick a spring to the bottom housings a bit better than if they were dry, the real value gained is often from reducing that metallic pinging sound – something which can only be accomplished by thoroughly coating the springs inside and out with a very thin layer of lubricant. While you can be like me when I first started the hobby and diligently paint each of your springs inside and out and effectively double the amount of time it takes you to modify your switches, you could instead just use what is known as a ‘bag lubing’ method. Bag lubing switch springs is a super old and popular technique which consists of taking all of the springs of the switches being lubed, tossing them in a plastic bag with a good few scoops of lubricant, and then sealing and shaking the bag for some length of time until the lube thoroughly coats the springs. While these will be a bit harder to fish out of the bag and unhook from each other than that painstaking painting method I used to adhere to, the consistency of lube application for the little time invested into it is more than worth it.
And in just as much reading time as it would take for you to set up some switches to lube, you’ve been brought up to speed on my super-top-secret tips for lubing that nobody will ever tell you. I mean, someone probably has said it somewhere along the line, but by and large I feel these three points of consideration get slept on quite a bit. While I have no particular guide that I would recommend for lubing switches that is extensive, from the top, and covers all the essentials, I am sure that whatever streamer or YouTuber who brought you into this space likely has a good enough guide to get you there. For those of you wanting to go super deep into switch lubing much like I have in my time switch collecting, I can’t recommend this switch science on switch lubing done by Walker of Walker’s Keyboard Science enough. Don’t worry, it’s got a lot more photos and a lot less words than one of my normal deep dives on switches!
https://www.theremingoat.com/shorts/lubing-switches-where-to-lube